More slow going here in NH, very very little has been accomplished as of late. Between work, 5 F. deg. temps, and a sore back, I've been laying off my boat for a bit.
In the meantime check out my compatriot in CA!
The GIS fleet is building, people are getting STOKED, sailing will be going down! What are YOU waiting for!?!?
Saturday, December 19, 2009
Thursday, December 10, 2009
On the road...
I've been at work, on the road for a bit now, with only minimal time (36 hrs or so) at home... just enough to catch up on chores, errands, do laundry, sleep, eat my one healthy meal of the week, and go back out the door again.
It's teeth grindingly frustrating. The clock ticks and still so much to do...
It's teeth grindingly frustrating. The clock ticks and still so much to do...
Tuesday, December 1, 2009
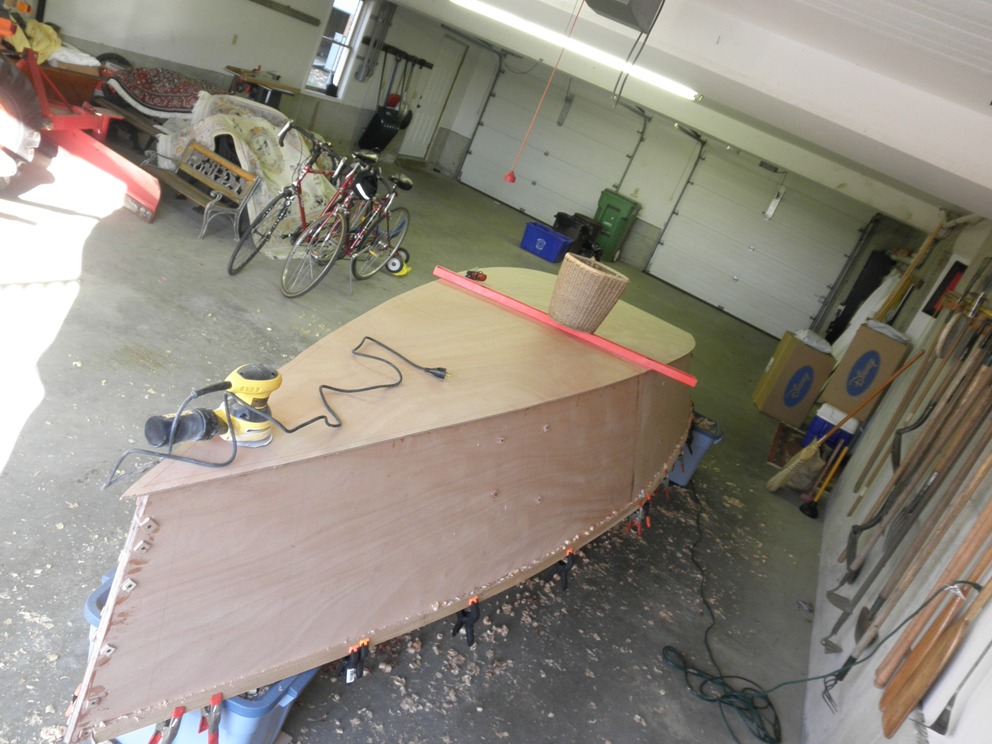
My gunwales scarf themselves.
That's how I roll. I don't have to scarf my gunwales, they'll do it themselves!
Check my mad scarfing skills:


So I decided to officially scarf my gunwales today, since I'm using temporary cheapo cedar to hold the shape of the hull. Last week I milled two .75"x4's (approx) into .75"x2's. Very close to the metric shape called for in the plans, actually, a little thinner and a smaller, but close enough. So I take one gunwale and just for kicks gently bend it around the starboard stern and CRACK!!! it breaks in two. I'm a tad perplexed, I didn't even it get it close to boat. So I grab the other gunwale from the 2nd stock, and it bends fine, as does its mate. Now I suspect the wood itself. I pick up the mate from the broken gunwale and ever so gently press it against the floor... CRACK! it splits in two with hardly any pressure what-so-ever on my end. I am dissapointed and perplexed. Its very fine Douglas fir with a nice even tight pattern, but now it would take multiple scarfs to get it to work.
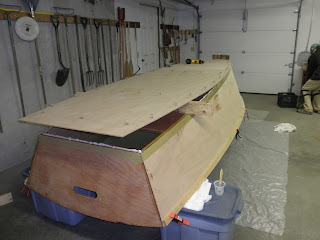
Otherwise, I removed the screws from the bottom, ended up breaking the heads off of three of them, leaving the shafts in the wood (dammit). I also sat her down on the floor to see how she balanced and to enjoy that beautiful rocker. She's pretty.
Check my mad scarfing skills:


So I decided to officially scarf my gunwales today, since I'm using temporary cheapo cedar to hold the shape of the hull. Last week I milled two .75"x4's (approx) into .75"x2's. Very close to the metric shape called for in the plans, actually, a little thinner and a smaller, but close enough. So I take one gunwale and just for kicks gently bend it around the starboard stern and CRACK!!! it breaks in two. I'm a tad perplexed, I didn't even it get it close to boat. So I grab the other gunwale from the 2nd stock, and it bends fine, as does its mate. Now I suspect the wood itself. I pick up the mate from the broken gunwale and ever so gently press it against the floor... CRACK! it splits in two with hardly any pressure what-so-ever on my end. I am dissapointed and perplexed. Its very fine Douglas fir with a nice even tight pattern, but now it would take multiple scarfs to get it to work.
Otherwise, I removed the screws from the bottom, ended up breaking the heads off of three of them, leaving the shafts in the wood (dammit). I also sat her down on the floor to see how she balanced and to enjoy that beautiful rocker. She's pretty.
Wednesday, November 25, 2009
Gluing down the bottom
After gluing together the hull, I came to several decisions, one of them being that gluing is a pain in the ass.
Yesterday I glued down the bottom, and yes, gluing is still a pain in the ass. So much so, that I swore off building another glue-only boat next time, that I'll take fasteners thank you very much, this sucks!
This morning, when I peeked into the garage at my nemesis glue-job-boat, my heart softened a bit, and I feel a little better. But I came close-- In my mind I saw a big bonfire at one point.
Yesterday I smoothed out the seam between the two bottom pieces, scoured the chinelogs and BH's with a rasp to provide a rough gluing surface, planed the transom flat, and screwed the bottom down in place. This took a while, and I was so concerned getting it on straight that it went on straight, but offset by about 2mm or so. I realized this after I screwed it on. This is not a big problem, there's supposed to be a gap of 90mm between the buttstraps for the daggerboard trunk, and I left 95mm for just this scenario. Storer recommends placing the bottom on with the centerline marks on the inside, to line up with the centerline marks on the BH's. A good idea, but then I would lose out on the markings up top that showed where the edges of the boat were (bottom is overcut by 2omm) and they provided a good guide as to screw placement. A better idea would be to have a centerline on both sides. Needless to say, lots of crawling under the boat and back, and shifting the ply ever so slightly.
Screws were placed every 300mm (lines from lofting) and along the BH's (3 for 1+2, 5 for 3, 4, transom). This was insufficient as you shall see later on.

After the bottom was screwed on I made special note of where I had some larger than normal gaps between the bottom and the sides. In these areas I would apply extra glue. Everything appeared tight and for the most part, everything fit together really well. I was impressed.
Next up, I unscrewed the bow of the boat, lifting it with 2x4's. After pre-coating the chinelogs and bottom with unmixed epoxy (more crawling around under the boat), I applied what I thought was copious amounts of glue, using the ziploc-bag method which I still don't like, but it seemed to make the most amount of sense. Mixing the glue with the silica is still a bear, I still don't know how to judge how much silica to add so I eyeball it until I get the appropriate consistency. This takes time. Then, the application. 3 pumps of resin with 1.5 pumps of hardener covered approximately- maybe- 4 feet. Hardly anything. This was going to take a lot of glue.
I moved down the line, sending the 2x4's down to the stern and gluing and screwing in their wake.
 (notice me mixing always mixing more mixing in background with knee pads that didn't come off between 10am and 11pm)
I think I made 3 moves aft, covering large sections at a time. The port bow had a little bit of a gap between the bottom and the side, and needed even more glue. This was going to take a lot of glue, as I mentioned before. This is when I started getting frustrated. When I put too much glue during the BH construction phase, it poured out all over the place and was a giant mess. Now, I was putting large amounts of glue onto the chinelogs and when the bottom came down, nothing. No excess squeezage, nothing. Let me just say this: Gluing the bottom takes a lot more glue than you think it will.
About halfway down, I realized I forgot to line the sides with packing tape to ease clean-up. SOB. So I had glue dripping down around the bow, which means I'll be sanding forever. Out came the packaging tape around the aft sections and the transom. By this time my wonderful wife took pity on me and she applied the glue while I mixed it. This doubled the speed of the operation, since mixing takes a long time-- at 3 pumps of resin per bag, there was a lot of mixing to do. She has a knack for how much glue to apply and when we screwed down her end, a perfect amount squeezed out. Damn.
With all the screws down (she held up the stern bottom and gently lowered it as I screwed it down moving aft), we inspected for a gaps. There were a couple small ones along the chine, and a few gaps that needed more screwed to hold the ply down. I would recommend a screw every 200mm at least, as opposed to every 300mm.
Then we flipped her over:


Hot damn, I have a completed hull (above pics are after the "clean-up" (used loosely)).
Clean-up was a super pain in the ass, by this time a lot of my squeegees were gluey and tacky and my rags were used up and I was running out of mixing cups and no matter how many new gloves I put on, I was sticking to everything. Some glue was firming up nice, which meant a struggle to clean it up as is smeared everywhere. Be ready to spend some serious time bent inside the boat cleaning it up. My glue station aftermath:
 This took me a few hours of prep, followed by about 7 hours of gluing/cleaning up. Solo, it was slow going, no doubt.
The bottom is still not done, I have to trim the excess off, which will be another pain because it's covered in rock-hard epoxy, but as far as I'm concerned, the big jobs in this are completed. From now on things can be accomplished in short spurts as opposed to 12hr marathon sessions. Thank goodness. I'm tired.
Did I mention this takes a lot more glue than you may think?
Monday, November 23, 2009
Bottom surprise! and limber holes and gaps filled
Today I overturned my bottom after gluing it last night. I was all very nice and neat and did my best and I was welcomed to see the fair bottom of my speed-demon boat with THIS:

HELLO DRAG. A giant glue mess that I will have to sand smooth. Which, if I estimate correctly, will take forever and a half. I shoulda woulda coulda put packaging tape around the seam, but my side panel job came out so neat (probably because I didn't put glue between the panels) that I didn't think I would see this. Also, note the glaring holes from my finishing nails that I used to pin the buttstraps in place. SOB, I went right through the ply. This is very embarrasing, I haven't gone through the ply anywhere where I didn't want to, this is the first time, and I have no idea how I did it. Again, I didn't do it on the side panels, so why now?
In other news, I planed down the new shims that will fill the gap between the bottom and the BH's, and cut/chiselled some limber holes. They look nice and neat from this angle because the ply is on the other side, which is all chipped up. I shoulda woulda coulda dammit scored the ply to get nice smooth cuts first, before going after it with my chisel.

Notice the stringy thing coming out of the limber hole... that's some fabric coming out from IN BETWEEN the layers of the ply! OOOooooooooh, mystery!
You may also notice the cloudy color, that because I've sanded the layer of epoxy there in preparation for bottom being glued on. I've decided to put in mini fillets along the BH's and the bottom for practice and to re-enforce the double seam, one between the bottom and the spacer, and the on between the spacer and the bottom of the BH frame.
Sunday, November 22, 2009
Filling gaps b/w BH's and gluing bottom
Today was spent filling in the gaps around the BH's. The first gaps to be filled were the ones in the notches between the chinelog and the BH's... the intrepid reader will remember I cut them too deep laterally. My wonderful wife who proved very adept at filling gaps around the stem went right to work on these notches, filling them with epoxy and shaping them with ply wrapped with packaging tape.

Once that was set, we glued on cedar spacers to fill the gaps between the bottom frame of the BH's and the bottom of the boat, which appeared because my notches in the BH's were too shallow, despite careful measuring. I didn't fool with cutting down the spacers before placing them, I glued them in place and I'll plane them down to match. I wanted to make sure to do the repair correctly rather than eyeball a piece that would look like it fit.

Finally, I glued together the two halves of the bottom. Very self explanatory. Shooting for gluing the bottom on Tuesday.

Tuesday, November 17, 2009
More gaps-- between BH's and bottom
Today I planed down the chinelogs to flat, in order to fit the bottom at some point in the near future. Unfortunately for me, something somewhere didn't add up.
When I cut the notches in my BH's, I was very careful to use an actual slice from my chinelog to trace a pattern for the notch. Somehow, my notches were too deep laterally, I have gaps there that need filling. Today I now realize that they are also too shallow vertically... after planing the chinelogs flat, I have a gap between the bottom of the BH's and the chinelog. Take note from BH3:

When I fit the bottom onto the boat, the gap is clear (boat is upside down):

This is especially frustrating because:
1: I measured the notches using an actual piece from the chinelog
2: I was very careful to do my best eye-balling job that the bottom of the ply appeared to meet the bottom of the BH's
In retrospect I should have:
1: After the dry-fit turn the hull upside down to get a good look at what was going on
2: Do a test plane portion to see where a flat chinelog ends up in relation to the BH's
So now I can do one of three things:
1: Fill the gap with loads and loads of epoxy when I put on the bottom
- Risky because I could deform the bottom if I screw too hard placing it into position
2: Fill the gap with a strip of wood that is painstakingly cut and glued into place
-Annoying work, AND it won't match the BH bottom frame
3: Continue to plane down the chinelogs until they match the BH's.
-I lose freeboard AND it could make the boat too wide at the bottom and the pre-cut ply for the bottom won't be able to accomodate the new width.
For all it's worth, here's the boat with the bottom kinda on:

I've just decided that solution #3 is not a good one.
I have now just decided to go with option #2.
Interestingly enough, BH1 came out perfect!... WTF, Over?
When I cut the notches in my BH's, I was very careful to use an actual slice from my chinelog to trace a pattern for the notch. Somehow, my notches were too deep laterally, I have gaps there that need filling. Today I now realize that they are also too shallow vertically... after planing the chinelogs flat, I have a gap between the bottom of the BH's and the chinelog. Take note from BH3:

When I fit the bottom onto the boat, the gap is clear (boat is upside down):

This is especially frustrating because:
1: I measured the notches using an actual piece from the chinelog
2: I was very careful to do my best eye-balling job that the bottom of the ply appeared to meet the bottom of the BH's
In retrospect I should have:
1: After the dry-fit turn the hull upside down to get a good look at what was going on
2: Do a test plane portion to see where a flat chinelog ends up in relation to the BH's
So now I can do one of three things:
1: Fill the gap with loads and loads of epoxy when I put on the bottom
- Risky because I could deform the bottom if I screw too hard placing it into position
2: Fill the gap with a strip of wood that is painstakingly cut and glued into place
-Annoying work, AND it won't match the BH bottom frame
3: Continue to plane down the chinelogs until they match the BH's.
-I lose freeboard AND it could make the boat too wide at the bottom and the pre-cut ply for the bottom won't be able to accomodate the new width.
For all it's worth, here's the boat with the bottom kinda on:
I've just decided that solution #3 is not a good one.
I have now just decided to go with option #2.
Interestingly enough, BH1 came out perfect!... WTF, Over?
Saturday, November 14, 2009
Filling stem gap w/ a fillet
Yesterday I glued the boat together and was stymied at the end with a gap that had appeared between the sides of the ply and the stem. See picture in previous post. My wife came in and suggested using an icing pipe thing-a-ma-jig, much like many people use ziploc bags. I've used ziploc bags in the past and found them somewhat cumbersome to use, but most importantly, I really wanted to get epoxy deep into the crevasse to maximize bonding.
So she jigged up a icing pipe and lined it with packing tape so we could re-use it, and then, using the patient steady hand of a culinary expert, she filled in the voids around the stem and made a nice fillet. Damn! What a woman!

In other news, I crawled underneath the stem to cut away some epoxy and saw this:

When I was dry-fitting the boat last week for the first time I heard some ***crack***ing noises, and since I didnt' see anything, I figured it was some epoxy somewhere settling or what-have-you. NOPE it was the chine logs right where they abut the stem. You'll notice the taper I put in to give them some room to fit together, and you'll also notice where the wood actually separated from itself. The glued face stayed firm to the plywood, which makes me feel like my gluing jobs are satisfactory. I'm bummed the wood split, but again, this whole area will be filled with epoxy and all will be good with the world again.
Friday, November 13, 2009
Gluing boat together #1
Today I decided to glue the boat together instead of pre-coating the sides with epoxy for several reasons:
1: I have the time to watch the boat as it cures of tonight and tomorrow
2: The temperatures were in the 50's... in a few weeks who knows how cold they'll go
3: I had the place set up in the garage
4: My gut told me to go for it.
Gluing is a pain in the ass. There, I said it.
It sucks, it's messy, it's sticky, and when you're by yourself it's a teeth-grinding frustration fest. ARGH!
BUT!!! This is how she'll come along.
Today I glued the BH's to the sides, making the dry-fit a goodness-for-real fit. I ran into a few problems, namely some gaps around the stem, and BH1 and BH2 were another wrastling match to get them into place as usual, except this time they were all lubed up with glue and were slipping all over the place. In the end, I got them in, though they might be ever so slight askew, if by just a few mm's. Initially when I saw them askew I almost lost it, but I can't lose sight of the fact that I'm building a boat, it's my first boat, and dammit, if the thing floats that will be a good thing.
I started out from the bow to the stern. From what I understand from the plans, you can remove a BH at a time and move aft. To start with the stem, I decided to remove BH1 and BH2 so that there would be less pressure pulling the bow apart when I tacked the stem back together. This, in hindsight was a mistake. The stem fit in nice and neat, but when I went to put in BH1, it pulls the sides apart. By the time I was done with BH2 (goes in a little easier than 1) I had pulled the sides back out to where they are supposed to be, and gaps between the stem and the sides appeared.

I want those gaps filled, I'm pondering a few different ideas.
BH3 went in smooth, but there are gaps between the sides and side arms:

Those too, will have to be filled.
BH4 needed some wrestling, and the transom would have been downright impossible for one person if not for my wonderful wife who showed up from work at exactly the right moment!!! So yay wife, and the boat was finished. A quick sightline down the centerline showed BH2 out of kilter. The port side needed to go down a bit, so I unscrewed the port side, and pushed down. It's still not perfect, and I'm not sure why (except the fact that it's almost impossible to do this single-handed) but I have to accept that and walk away. All in all, a long, tiring, sometime frustrating day, but when it comes down to it, the boat is in one, permanent piece.

You can see signs of BH Wrestling in this pic. Notice the temporary gunwales using old cedar strips that were laying about.
Thursday, November 12, 2009
SUCCESSFUL DRY FIT!!!
SHE STANDS ON HER OWN!!! OH HAPPY DAY!


She'll slice you in two! AAAARRRRGGGHHHHHH!!!
 Flash made BH1 and 2 darker than they are.


 The last one here is through the transom hole.
A couple of notes:
Everything is almost perfectly level and/or lines up. Seat cleat on transom to BH4 for example, BH1 and BH2, transom and the sides etc.
I used 1 1/4" drywall screws with plywood backing on the heads.
My notches are all mostly too big, epoxy will have to fill them. Also, my bevel on the transom was a little too much, but it will be easy to plane down.
SHE LIVES! SHE LIVES! LONG LIVE MY BEAUTIFUL BOAT! POSEIDON BE PRAISED!
ZINEA FROM CRIMEA
SUCCESS!
One of my big problems from the dry-no-screw-fit the other day was that I could not suck in the chine logs around BH1 and BH2 enough to easily screw the drywall screws through the ply to hold everything in place. I wrastled and wrastled with it and then the screws pulled out and I almost threw my drill through a window.
Today I put the boat back together for another dry-no-screw-fit again and hemmed and hawed over it with my sister-in-laws husband for an hour or so. We came up with many ideas, like driving eye screws into the chine log and getting a turnbuckle to pull the chines together. Another idea was to join two clamps together underneath the boat and use a block to keep them from sliding forward along the hull... but how to defeat gravity from dragging the clamps down? BEHOLD MY GENIUS:


The above sequence is from starboard to port.
There is definitely a beautiful curve to the bow now that I got it sucked in, the boat looks sublime!

Take note that the boat is resting on three different sized objects so not everything lines up great right now. ALSO my notches in my BH's are too big, except for BH1. Thank goodness for the filling power of epoxy! It's not going to be the neatest boat in the world, but it will work, by Jove!
SO now I'm going to mark where things go, and then precoat the panels with epoxy, and varnish the BH's so I can just drop everything in place and not have to sand upside down, etc.
Saturday, November 7, 2009
Progress! Yeah! Wet-on-wet, stem, quick dry-fit!
I was home for a few days, and I buckled down and got right to it.
Day one:
First I enlarged the holes in BH2 and 3. I want more room to store my gear: oars, extra spar, etc. etc. I was able to do this neatly and cleanly with my scrolling blade that I discovered in my blade set! Yo dummy! I'm much happier now with the results.
Second: I wet-on-wetted the un-wetted sides of the BH's with epoxy to encapsulate the wood. Three layers, which got it quite thick I may add. Maybe a little too thick. I used squeegees and and a brush and the roller a la Storer. I must say I wasn't impressed with the roller method, I feel like I could get a smoother surface without it-- the roller left funny little bumps. I think the thickness is just sloppiness on my part and maybe too much epoxy. Needless to say, everything will be sanded down for paint/varnish whatever I decide. I'd love to do some brightwork, but I don't know if I want to do the work. I see lots of sanding in my future with the splotchy epoxy job.
That being said, epoxy got everywhere, and it was a big mess, including the undersides of my BH's, despite carefully applying tape everywhere to hold the mess. I used painting masking tape, packaging tape that would have hung lower than the BH would have prevented epoxy from curling underneath and dripping onto the BH backsides that were already done.
Day two:
Then I cut the notches for the chinelogs into the BH's. This was more difficult than I thought it was going to be. I used my nifty Japanese pull saw, and it was awesome. I paid very close attention to bevels and carefully marked the boundaries of the notches. A few mistakes were made, but nothing that can't be saved or filled with epoxy. Taking my time instead of rushing this part was worth its while.


Afterwards I FINALLY CONQUERED THE DREADED STEM! (second try)
I unfortunately did not photo-document this. This is how I did the stem:
1. Cut out a rectangular blank of the stem from my stock.
2. Draw the stem out on the blank-- triangle on top, the front edge and then on the backside, the back edges graduating from 36mm at top to 22mm at the bottom.
3. Plane down the starboard and port sides from 36mm at the top to 22mm at the bottom. At this point, looking at it either from the stern or bow, I have a trapezoid that is wider at top than at the bottom. Still rectangular.
4. Now, all that is left is to remove the material from the backside to the bow point. Using the backside 36mm-22mm edge, I planed down the material to the front pointed bow. I left the bow a little wider than a knife edge, about the width of the sharpie pen mark. It's a little tricky to get the second side because there is now no longer a flat surface to work.
5. Patience.


THEN THEN THEN
I kind-of dry fitted the hull together!!! (I was impatient, I had to see the boat for morale)
I screwed on the stem to the bow pieces, with screws through ply backing as described in the Storer plans. This is hazardous, because once the screw gets into the backing it spins around like the devil and I'd have to push frantically for bite into the side of the boat or else the screw and backing ply goes zooming off the bow and then I'd slam the drillbit into the side of the boat leaving a good dent. A good method is to push the screw through the backing first so a little pokes out that it can be stuck into the side by hand to hold it in position. Watch your fingertips!
So the stem went in and then I spent a while screwing around with BH's and and the transom and placing them more or less where they were supposed to go. I took some tie-down straps and cinched the stern together to get a visual idea of what the boat was looking like.

It looks like a Goat Island Skiff! Amateur Style! But a GIS, nonetheless, the curvy midsection and straight knife-like bow are telling.

HOLY SHA-MOLEY!!!
I attempted to screw in BH1 but it was about as difficult as pulling my own wisdom teeth. Sagely, I walked away when one side of BH1 ripped away from the screws holding it into the port side.
In the following picture you can see the gap between the chinelogs and BH2. Imagine BH1, which is just as bad if not worse. It's going to be a true WRASTLING nightmare to get that together, I think. I'm going to re-measure my BH's, make sure they are the right size, and do some brainstorming. BH3 looks gappy, but it's not bad, a little squeezing and it fits right in.

Some things I noticed: The chine logs butted up against each other in the bow next to the stem. A little bit of chisel work took care of that, giving them more room.
 Also, my stem needs to be cleaned up a bit, especially the bottom portion. Maybe this will aid in screwing in BH1. As I said, I was impatient to actually see something, and I'm glad I did this today.
A note on tools
A few things on tools that I have found out the past few days.
A japanese pull saw is awesome. I doubted it at first, hemming and hawing for months before getting a small one-sides saw. A FANTASTIC PURCHASE. Versatile, sharp, easy to use, and precise. Practice first, because you'll saw through something important quickly and without realizing it (trust me).
My random orbital sander was a $9.95 DEATH DISASTER I purchased at cheap-tool-emporium Harbor Freight. It's so frustrating to use I want to throw it at the cement wall. I will have to go buy a better one that actually secures the sandpaper.
Most importantly, I was perusing my jigsaw blades and saw something called a "scrolling blade." It was small and skinny. "Hmmmm, I betcha this is for going around corners a little tighter than the normal blades!" Hmmmm, I reckon I was correct... and this was after I cut the hole through the transom, BH2 and BH3. Boo me, for not knowing my tools. Again, amateur style is my building style.
Friday, October 30, 2009
Chinelogs
The epoxy on the chinelogs took well, the scarf is a success as far as I'm concerned. Once I sanded down the excess epoxy the joint looks clean and tight, I'm happy with the result. Today I placed the chinelogs in position onto the sides of the boat. I did things a little opposite because I'm by myself and I was trying to make the operation go smoothly and precisely. I placed the bow piece 5cm back as dictated by the plans, with 1cm overhang the bottom edge, and screwed it in place. I placed a total of 6 position screws that are not designed to provide the clamping power, I used clamps instead. I get the feeling that the plans call for screws to be pushed through from the outside of the hull, but I felt I'd have more control over the chinelogs if I did everything facing them. I was careful to place the screws in hidden locations, behind BH's, in watertight tanks, etc. I have pretty much 1cm throughout the length of the side, with a few locations with 1mm variations, of which I'm ok with. A pre-coat of epoxy, then thickened epoxy application, clamps, clean up (difficult), and viola:

All I have left to do now is put together that stem and I can do a dry-fit.

All I have left to do now is put together that stem and I can do a dry-fit.
Wednesday, October 28, 2009
Wet-on-wet epoxy coating
Today I coated one side of my BH's with two coats of epoxy to seal and waterproof the wood. I used the wet-on-wet method that Storer recommends. The first coat when on quite well, I used a small cheap squeegee thing to spread it around, and a small roller held stationary to smooth it down. I kept one BH on just using the spreader, to little difference. Once the first layer got tacky I added the second layer of epoxy, again with the squeegee and then rolled smooth. The second coat went on waaaaaay smooth and took less epoxy as well. I was actually surprised at how little epoxy this whole operation took. A little goes a long way.
At this point my wife called me to join her downtown for dinner, which I happily did. I thought I would have had enough time to get back to apply coat three, but I was wrong. I came back and the epoxy had all hardened up. Some bulkheads will have to be "de-waxed" and sanded for the final coat, because I need these to be waterproofed up. Others are good to go right now with two coats because in some places it went on a little thick. So I'm good in some area, not so good in others, all in all, I'm not worried. I made a little more work for myself, but oh well.

Damn. Those look good.
The gluing of the buttstraps and the chinelogs yesterday still goes. The temperature is maybe around 50 deg. in the garage, so today I built a heat box with a space heater and a sheet:

Not the most efficient design, but better than nothing under the circumstances. The glue has set up, but if I press firmly I can still get a fingernail in, which is a Storer-failure. So I'm not touching anything and we'll wait until tomorrow before I move anything.
The dreaded stem still continues to stump me, but I shall solve it by jove!
Tuesday, October 27, 2009
My big day
Today was quite the day. I'm over my cold, as in, I don't feel like super-crap anymore, but my head and chest are still congested to hell and back. However, since I'm slowly on the up and up, off to the basement for a little R+R.
Last night I realized that I had beveled the bottom of BH1 in the wrong direction. Today I fixed this by re-beveling it flat, and just leaving it as such until later. If I have to bevel it in the correct direction, so be it. It's only 2mm so it's not too tricky.
Second, I found this:
 Delamination in the ply on my Starboard bow, inboard. Approximately 4"x6" or so. Nothing on the "mated" side, the Port stern, so I'm assuming it is only this piece that has the problem. I sounded it out with a pencil, and I've got a good idea of its shape. I poured straight epoxy into the hole, then squashed it with bricks.
Third, I discovered this:

That's my finger pointing at where the bow SHOULD be. OOPS. I'm slowly coming along with the dreaded stem, and I went to match the stem to the bow and it came up a couple of cm short. Either my stem was wrong or my bow was wrong. I busted out the lofting map for the sides and for some damn reason, I measured 55mm from the end of the ply to the point of the bow rather than 55mm from the last 300mm mark. Damn, bro, good catch! So I re-marked the bow and cut them anew on both sides. The stem fits perfectly now, with room to spare for the bow knee.
Then, I got gutsy and ripped two of my cedar planks and and scarfed them for the chinelogs:
 This is my scarf. Some of you are really going to hate this, but I eyeballed it on the table saw, and then planed them to match. Not perfect, but close enough for this amateur! I used a 1:6 ratio, so that would be 1 1/2" : 9".
THEN, I cut out the buttstraps and glued my scarfed chinelogs and my side together!
 Here we are now in the garage. The buttstrap gluing kinda blew, I was by myself and I rushed it. I was sure I put on enough glue, but very little actually oozed out from underneath the straps. I'm actually a little concerned I may not have put enough, but maybe I put just the right amount, I tend to go overboard with the glue. So we'll have to see about this.
Finally, I glued on a little piece of ply for backing on the transom for el rudder. That's Spanish. That in itself was a mini-adventure, because the ply I chose for it initially starting sliding around after I glued it up on the old epoxy from the frame and the seat cleat. WOOPS. So I pulled it off quick, tore apart the garbage for an old jigsaw blade, and holding the jigsaw an inch above the ply ripped a small piece of one end so it could sit better between the frame and the cleat. Of course I got wood dust all over the backing, and I scraped it off, threw on some thickened epoxy, and called it good. I thought this would have been a simple operation, so I didn't wear gloves and holey moley my hands got sticky.
On a blog-related note, I am deleting the timing scoreboard from the blog. It's beginning to get inaccurate and more difficult to keep up with. Today I did a million things and I'm not keen on attempting to figure out what was what. So maybe from now on just a tally total.
Last night I realized that I had beveled the bottom of BH1 in the wrong direction. Today I fixed this by re-beveling it flat, and just leaving it as such until later. If I have to bevel it in the correct direction, so be it. It's only 2mm so it's not too tricky.
Second, I found this:
 Delamination in the ply on my Starboard bow, inboard. Approximately 4"x6" or so. Nothing on the "mated" side, the Port stern, so I'm assuming it is only this piece that has the problem. I sounded it out with a pencil, and I've got a good idea of its shape. I poured straight epoxy into the hole, then squashed it with bricks.
Third, I discovered this:

That's my finger pointing at where the bow SHOULD be. OOPS. I'm slowly coming along with the dreaded stem, and I went to match the stem to the bow and it came up a couple of cm short. Either my stem was wrong or my bow was wrong. I busted out the lofting map for the sides and for some damn reason, I measured 55mm from the end of the ply to the point of the bow rather than 55mm from the last 300mm mark. Damn, bro, good catch! So I re-marked the bow and cut them anew on both sides. The stem fits perfectly now, with room to spare for the bow knee.
Then, I got gutsy and ripped two of my cedar planks and and scarfed them for the chinelogs:
 This is my scarf. Some of you are really going to hate this, but I eyeballed it on the table saw, and then planed them to match. Not perfect, but close enough for this amateur! I used a 1:6 ratio, so that would be 1 1/2" : 9".
 THEN, I cut out the buttstraps and glued my scarfed chinelogs and my side together!
 Here we are now in the garage. The buttstrap gluing kinda blew, I was by myself and I rushed it. I was sure I put on enough glue, but very little actually oozed out from underneath the straps. I'm actually a little concerned I may not have put enough, but maybe I put just the right amount, I tend to go overboard with the glue. So we'll have to see about this.
Finally, I glued on a little piece of ply for backing on the transom for el rudder. That's Spanish. That in itself was a mini-adventure, because the ply I chose for it initially starting sliding around after I glued it up on the old epoxy from the frame and the seat cleat. WOOPS. So I pulled it off quick, tore apart the garbage for an old jigsaw blade, and holding the jigsaw an inch above the ply ripped a small piece of one end so it could sit better between the frame and the cleat. Of course I got wood dust all over the backing, and I scraped it off, threw on some thickened epoxy, and called it good. I thought this would have been a simple operation, so I didn't wear gloves and holey moley my hands got sticky.
On a blog-related note, I am deleting the timing scoreboard from the blog. It's beginning to get inaccurate and more difficult to keep up with. Today I did a million things and I'm not keen on attempting to figure out what was what. So maybe from now on just a tally total.
Subscribe to:
Posts (Atom)