The epoxy on the chinelogs took well, the scarf is a success as far as I'm concerned. Once I sanded down the excess epoxy the joint looks clean and tight, I'm happy with the result. Today I placed the chinelogs in position onto the sides of the boat. I did things a little opposite because I'm by myself and I was trying to make the operation go smoothly and precisely. I placed the bow piece 5cm back as dictated by the plans, with 1cm overhang the bottom edge, and screwed it in place. I placed a total of 6 position screws that are not designed to provide the clamping power, I used clamps instead. I get the feeling that the plans call for screws to be pushed through from the outside of the hull, but I felt I'd have more control over the chinelogs if I did everything facing them. I was careful to place the screws in hidden locations, behind BH's, in watertight tanks, etc. I have pretty much 1cm throughout the length of the side, with a few locations with 1mm variations, of which I'm ok with. A pre-coat of epoxy, then thickened epoxy application, clamps, clean up (difficult), and viola:
All I have left to do now is put together that stem and I can do a dry-fit.
The most awesome open boat cruising adventures in Maine and beyond! Sea Pearl 21 SCOUT camp cruises and gunkholes up and down the New England seascape leaving absurdity in her wake. Some duckpunting, too! Quickly, fellow sailors-- to the Sea! I,AZP/Goat Island Skiff specific posts run from May 2009 to May 2014
Friday, October 30, 2009
Wednesday, October 28, 2009
Wet-on-wet epoxy coating
Today I coated one side of my BH's with two coats of epoxy to seal and waterproof the wood. I used the wet-on-wet method that Storer recommends. The first coat when on quite well, I used a small cheap squeegee thing to spread it around, and a small roller held stationary to smooth it down. I kept one BH on just using the spreader, to little difference. Once the first layer got tacky I added the second layer of epoxy, again with the squeegee and then rolled smooth. The second coat went on waaaaaay smooth and took less epoxy as well. I was actually surprised at how little epoxy this whole operation took. A little goes a long way.
At this point my wife called me to join her downtown for dinner, which I happily did. I thought I would have had enough time to get back to apply coat three, but I was wrong. I came back and the epoxy had all hardened up. Some bulkheads will have to be "de-waxed" and sanded for the final coat, because I need these to be waterproofed up. Others are good to go right now with two coats because in some places it went on a little thick. So I'm good in some area, not so good in others, all in all, I'm not worried. I made a little more work for myself, but oh well.
Damn. Those look good.
The gluing of the buttstraps and the chinelogs yesterday still goes. The temperature is maybe around 50 deg. in the garage, so today I built a heat box with a space heater and a sheet:
Not the most efficient design, but better than nothing under the circumstances. The glue has set up, but if I press firmly I can still get a fingernail in, which is a Storer-failure. So I'm not touching anything and we'll wait until tomorrow before I move anything.
The dreaded stem still continues to stump me, but I shall solve it by jove!
Tuesday, October 27, 2009
My big day
Today was quite the day. I'm over my cold, as in, I don't feel like super-crap anymore, but my head and chest are still congested to hell and back. However, since I'm slowly on the up and up, off to the basement for a little R+R.
Last night I realized that I had beveled the bottom of BH1 in the wrong direction. Today I fixed this by re-beveling it flat, and just leaving it as such until later. If I have to bevel it in the correct direction, so be it. It's only 2mm so it's not too tricky.
Second, I found this:
Delamination in the ply on my Starboard bow, inboard. Approximately 4"x6" or so. Nothing on the "mated" side, the Port stern, so I'm assuming it is only this piece that has the problem. I sounded it out with a pencil, and I've got a good idea of its shape. I poured straight epoxy into the hole, then squashed it with bricks.
Third, I discovered this:
That's my finger pointing at where the bow SHOULD be. OOPS. I'm slowly coming along with the dreaded stem, and I went to match the stem to the bow and it came up a couple of cm short. Either my stem was wrong or my bow was wrong. I busted out the lofting map for the sides and for some damn reason, I measured 55mm from the end of the ply to the point of the bow rather than 55mm from the last 300mm mark. Damn, bro, good catch! So I re-marked the bow and cut them anew on both sides. The stem fits perfectly now, with room to spare for the bow knee.
Then, I got gutsy and ripped two of my cedar planks and and scarfed them for the chinelogs:
This is my scarf. Some of you are really going to hate this, but I eyeballed it on the table saw, and then planed them to match. Not perfect, but close enough for this amateur! I used a 1:6 ratio, so that would be 1 1/2" : 9".
THEN, I cut out the buttstraps and glued my scarfed chinelogs and my side together!
Here we are now in the garage. The buttstrap gluing kinda blew, I was by myself and I rushed it. I was sure I put on enough glue, but very little actually oozed out from underneath the straps. I'm actually a little concerned I may not have put enough, but maybe I put just the right amount, I tend to go overboard with the glue. So we'll have to see about this.
Finally, I glued on a little piece of ply for backing on the transom for el rudder. That's Spanish. That in itself was a mini-adventure, because the ply I chose for it initially starting sliding around after I glued it up on the old epoxy from the frame and the seat cleat. WOOPS. So I pulled it off quick, tore apart the garbage for an old jigsaw blade, and holding the jigsaw an inch above the ply ripped a small piece of one end so it could sit better between the frame and the cleat. Of course I got wood dust all over the backing, and I scraped it off, threw on some thickened epoxy, and called it good. I thought this would have been a simple operation, so I didn't wear gloves and holey moley my hands got sticky.
On a blog-related note, I am deleting the timing scoreboard from the blog. It's beginning to get inaccurate and more difficult to keep up with. Today I did a million things and I'm not keen on attempting to figure out what was what. So maybe from now on just a tally total.
Monday, October 26, 2009
Moving along
A bunch of small items were taken care of today despite my continued head cold and heavy congestion. Sneezing and coughing and snotting all over my boat was a great experience, really.
Anway, All the BH's are beveled, I notched the top frame on BH3 where the middle 90mm was supposed to have never been applied (room for centerboard case), and I cut and traced out the timber for the stem. I also cut the holes into the BH 2 and 3:
They're still rough, I haven't sanded them smooth or even yet. You may notice I went for the trapezoidal shape on BH2, this was at first done because I was a little nervous doing circles with the jigsaw a la transom. After I did it, I thought, damn, that looks bad. But then I realized that without the curves I can stuff more equipment (picnic basket, wine, beer) in that forward space between BH1 and 2. So I liked that, but then I waffled back to cutting a bigger hole to get curves. At this point my wonderful wife wandered in as I sat perplexed, and she gushed at how imaginative I was for mixing and matching shapes for the holes and how great it looked.
The trapezoid stays, gentlemen.
Up next:
- Shape and finish the dreaded stem
- Cut timber and scarf chinelogs
- Apply re-enforcement on transom for rudder
- Cut notches on BH's for chinelogs
- Coat all BH's with epoxy (I may do this later because I'm getting impatient to see the boat)
- Glue up the sides
- Touch up with the plane
- Screw it all together for a dry fit in the garage
- Freak out as I try to find a warmer place than the garage to put it for the winter so I can work on it.
Sunday, October 25, 2009
Transom takes a hit!
In the course of beveling the bottom edge of the transom, I took a couple of chunks out of the endgrain of the starboard side frame. Then, I head a ***CRACK*** on one pass of the plane. I ripped a sizeable piece of the side frame away from itself. I carefully chiselled off the exposed end, and on another pass from the plane... ***CRACK*** and I took another strip, this one very deep. I can epoxy this all together, but I'd just as rather not have the integrity of the wood comprised. I only had one remaining bevel left with an endgrain, and I beveled it with a rasp and then planed the rest to match. Dammit-- This is an amateur mistake! Other amateurs beware!
Take note that I did not break the epoxy bond between the side frame and the transom ply, the surface layer of the side arm remains firmly glued to the ply.
Beveling bulkheads
I also recently started beveling my BH's and transom since they are all glued up. Despite my initial fear of beveling, it is quite easy, even for a beginner. I mark the edges of the BH first and draw a line for the bevel, and then on the face that is to be beveled I draw a line connecting the two edge bevels. That way, I have a nice visual of what needs to be planed off. Here's an example:
Here's a side of BH1 all beveled up:
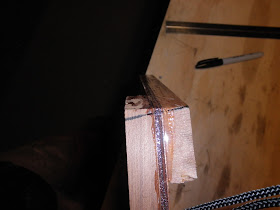
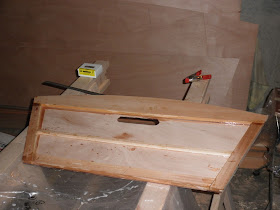
BH 1 and the Transom are easy to bevel because all the frame pieces are on the same side. I am running into problems on BH 2 and 4 because I need to make bevels but can't get my plane to the end of the BH because a frame on the opposing side blocks it. This is frustrating. I glued everything up as I was supposed to, minus the side frames that are added after the boat is glued together (this is me saying to the skeptic: I read the directions and followed them to the T). In retrospect, I feel like I needed to piecemeal construction of the BH and bevel a piece at a time. Here's an example of the problem on BH4:
Above is BH 4, looking along the bottom edge that is to be beveled. The bevel drops from left to right, so the high side is on the left. The side frame in the distance will block the plane from finishing the last section, unless I can get a bevel on the side frame. Then plane should pass over it no problemo. Here's another example but on a side frame now:
So this is looking down the side of this particular BH. I have marked the bevel I need on the side (2mm) with the continuation on that bottom frame. From this perspective imagine the plane is coming down the side of the BH towards you, the viewer. As you can see, it will be blocked by the side frame unless I can bevel that too. I don't know how to easily bevel this so I can bevel the rest.
UPDATE: Someone over at the Storer forum mentioned a few options, of one them being a rasp. I took care of this problem in 5 minutes... my brain's just not working today. There's a reason I'm not at work!
Here's a side of BH1 all beveled up:
BH 1 and the Transom are easy to bevel because all the frame pieces are on the same side. I am running into problems on BH 2 and 4 because I need to make bevels but can't get my plane to the end of the BH because a frame on the opposing side blocks it. This is frustrating. I glued everything up as I was supposed to, minus the side frames that are added after the boat is glued together (this is me saying to the skeptic: I read the directions and followed them to the T). In retrospect, I feel like I needed to piecemeal construction of the BH and bevel a piece at a time. Here's an example of the problem on BH4:
Above is BH 4, looking along the bottom edge that is to be beveled. The bevel drops from left to right, so the high side is on the left. The side frame in the distance will block the plane from finishing the last section, unless I can get a bevel on the side frame. Then plane should pass over it no problemo. Here's another example but on a side frame now:
So this is looking down the side of this particular BH. I have marked the bevel I need on the side (2mm) with the continuation on that bottom frame. From this perspective imagine the plane is coming down the side of the BH towards you, the viewer. As you can see, it will be blocked by the side frame unless I can bevel that too. I don't know how to easily bevel this so I can bevel the rest.
UPDATE: Someone over at the Storer forum mentioned a few options, of one them being a rasp. I took care of this problem in 5 minutes... my brain's just not working today. There's a reason I'm not at work!
Transom glued up!
Ok. I've been off the radar for a few weeks for several reasons. Namely: Job related problems now solved, my marriage, my inadvertent cutting-off-the-tip-of-my-finger winterizing my garden which led to a giant bandage and stitches, and my work that takes me on the road. I'm suposed to be on the road today, but I'm not because I have a massive head cold and I think my eyeballs are going to pop out of my head. So no work for me.
About two weeks ago, I glued up the transom. Storer recommends not using screws in the transom, I think this is for aesthetic reasons. I did use screws as opposed to the nails I had been using for the BH's, primarily because I could get a slightly tighter fit. I did not use nails on the transom head-board because I wanted to maintain the visual integrity of that piece, and I was able to secure it in spot with clamps through the tiller-hole. Everything came together really nice and I am pleased with the result. I was careful to wipe away the excess, and I was sure I had gotten everything, but I didn't. I came back and found hardened drips that materialized sometime during the night and they dripped onto the stern-stern of the transom. Using a chisel to cut them off, I ended up mucho-biting into the top of the transom and took a chunk out of the ply. OH WELL. I saved the piece and will epoxy it back in.
Otherwise, I think the transom looks good!
Tuesday, October 6, 2009
Gluing BH 4 and some things I found out about gluing
Alright, I'm a little frustrated at myself right now, because things are coming along nice, but not coming along like I want them too. Everything will be OK in the end, but it won't be as nice and neat as I would like to see, and that's aggravating. A lot of the mess stems from excess epoxy squeezing out and making the seams look all lumpy and dumb. A faster clean-up job before anything even begins to think about setting up would have saved me from having stupid looking frames.
First, I've been having some problems at work that are pretty significant, and I wasn't as focused on gluing as I wanted to be or could have and that led to sloppy gluing work.
Second, I just don't have wood gluing experience. My epoxy/fiberglass experience is solely focused on my Laser, hull #194, from the early 70's. This boat has hit submerged objects, sandbars, docks, buoys, other boats, etc. at speed. Laser speed. Fast. Rig humming with 2/3 of the boat out of the water fast. Once, it fell off my car... while I was driving. Needless to say, I'd just slop some epoxy on and keep going. Now that I'm gluing together my wood boat, I can't be as messy, or at least, I'd rather I wasn't as messy.
BH1 is messy but will be hidden mostly from view. BH2 is somewhat in view and the frames are going to visible, and it's kind of messy. BH 3 could have come out perfect, but it looks messy too because I rushed and didn't STOP.THINKFIRST.NOTSOFAST. BH 4 came out really nice and clean, but the frame is mostly hidden within the rear airtight box, so no one will see my clean job! Dammit! Roar!
So here's a tip to you beginners out there: First, read all you can about epoxy. I have yet to find a nice primer/tutorial on wood gluing for boats, and that would have helped. The Storer forum, my thread in particular could help you out. Second, my biggest mistake in neatness is that I waited for the epoxy to firm up to a putty and then tried to hack off the excess. This is a mistake. This evening I glued BH4 together, let it sit for a few minutes to excess epoxy oozed out, and just cleaned it right up. Presto besto pesto yum done. A nice neat job. Why I didn't think about this 3 BH's ago, I know not.
Sunday, October 4, 2009
Gluing BH2 + 3
This morning I glued up BH2 and BH3, this time precoating the pieces with straight up epoxy and then mixing a thicker glue with the silica which makes me cough like the dickens, hopefully that stuff isn't setting up in my lungs. Things definitely went a little smoother this morning. One person over at the Storer forum suggested drilling small holes and dropping in some nails in the holes to hold the pieces laterally. I did exactly that this morning, and it works quite well, I am pleased with the result. Unfortunately, haste makes waste and I put one piece on upside down, so I turned it around and applied more glue after ripping it up, and a put another piece down 180 deg. of what I wanted, but it works in that position anyway but not as aesthetically pleasing, so I left it in place. The side arms on BH3 also extend all the way up beyond the ply, and I precoated the whole arm even though that was unnecessary. Oops. One more BH to go, and then I can tackle that transom.
Saturday, October 3, 2009
Creeping evidence
Here's the starboard side arm where it joins (or is supposed to join) the top frame on BH1. SOB decided to go for a walk after I thought it was going to set in place. How to avoid this?
And this is my new paperweight/epoxy trophy that I just cracked out a yogurt container. At least I got my container back! There are 2 ziploc bags and probably 20 bucks worth of epoxy in there.
Second Gluing
I just went back and glued on the side arms to BH1. This time it went much better than the first time. First, I used 1 pump of resin to 1/2 pump of hardener. Again, I tried to put it in a ziploc bag, but the whole thing turned into a mess, and I said screw it. So another pump and a half pump into a yogurt container, and I mixed in enough silica to make it thick like peanut butter, and then I spread it over the plywood with a stick. I took the remaining to coat in the inside of the arms. This time, it was much easier to work with. I'm relatively pleased this time around, but I'm still getting "creep." As in, my side arms are slowing sliding around to where they want to go, not where I set them and want them. I'm not screwing my frames into the BH ply, but maybe I should? There's not real method to the creep, the top and bottom frames crept inward, but my side arms creep outwards. I hover over the entire assembly and readjust as necessary to keep things were I want them. I don't know how else to do it.
What a mess. Again, "mY Fisrt Baot."
I'm definitely saving the transom for last.
What a mess. Again, "mY Fisrt Baot."
I'm definitely saving the transom for last.
Bulkhead #4 and First Gluing Disaster
Jeezum Crow.
First, I've been having problems on the employment front that has been keeping me out of the workshop. Today, I'm feeling good, confident, it's raining, I've got nothing else going on, so I roll into the shop and quickly pound out the framing for BH4. Then, I decide to start my first gluing.
Holy Baloney, what a disaster the whole thing turned into. First, I cover most everything with plastic. I set up my pumps, prime them, get my yogurt cups, my ziploc bags to deliver my epoxy to the wood Storer-style, etc etc etc. I got medium speed epoxy, so I'm feeling pretty good and I go ahead and throw in a mess of pumps to the appropriate 2:1 ratio for the "Marinepoxy" brand that I'm using. I decided to start out as clean as possible with the Duckflat method mentioned on Storer's website, ie. mix everything in the ziploc bag. So I pour in the resin and hardener, I "massage" the bag to mix, then I start dumping some silica into it. For this part, I placed the bag over a yogurt cup. Interestingly enough, the level of epoxy in the bag continued to get lower and lower as I mixed in silica. A hole mysteriously appeared at the bottom. If this was a self-inflicted hole or a heat-inflicted hole, I don't know. Whilst I was investigating the bag dropped into the cup. At this point the mix just freaking took off temperature wise. "Whoa Nelly!" Batch One, done. I sat it aside and kept an eye on it so it didn't combust on my workbench.
Discouraged but not out, I mix up batch Two. This time, screw it, I'm mixing in a cup, and I'll pour into a ziploc bag. The mixing goes well, I dump in the silica, that goes well. It's thick, but not super thick, definitely not peanut butter thick, but the temperature was starting to rise, and I wanted the epoxy delivered on the wood before it took off like the previous attempt. So into the bag, I cut the corner and that stuff just started pouring out all over the place. Then the bag got super hot, I dropped it, kicked it aside and starting grabbing the top and bottom frames for BH1. I placed them accordingly and clamped them down, but they started swimming all over the epoxy and wouldn't sit still. Epoxy was oozing out of every seam all over the place, I was watching two batches now for tell-tale smoking and potential combustion, and I was worried like the dickens that my frames were going to set akimbo.
Son of a bitch! Everything is somewhat quieted down now, and things are positioned somewhat where I want them, but not as perfect as I imagined. I'm not down with the ziploc bag idea with the speed at which the epoxy starts to hyperventilate. I've got to spread it over a larger area to mix and then either pour into a bag or distribute it over the surfaces with a different method. I'm going to try the sidearms tonight just for fun, but after I calm down.
Edit: Some ideas on gluing better.
Mark the centerlines on the top and bottom frames to line up with the centerline on the BH in case everything goes to hell in a handbasket and the sidearms are removed.
Mix smaller batches, as in 2 pumps to 1 pump. Just keep it small and work from there.